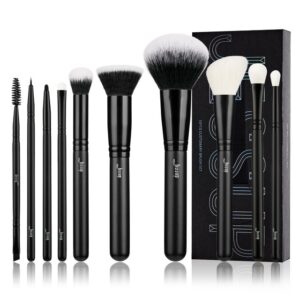
Essential Tips for Cleaning Your Makeup Brushes
Brush Up on Your Beauty Routine
 Are you tired of dealing with clogged pores, breakouts, and uneven makeup application? It’s time to give your beauty routine a little TLC by focusing on an often-overlooked aspect: cleaning your makeup brushes.
Whether you’re a makeup enthusiast or just a casual user, regularly cleaning your brushes is essential for maintaining healthy skin and achieving flawless makeup looks.
In this guide, we’ll dive into the why, when, and how of makeup brush cleaning, providing you with expert tips and tricks to keep your brushes in top shape. From the importance of removing product build-up to the best cleaning techniques for different brush types, we’ve got you covered.
So, say goodbye to dirty brushes and hello to a refreshed and more effective beauty routine. Let’s brush up on our knowledge and get ready for a clean and gorgeous transformation!
Importance of cleaning makeup brushes
 Makeup brushes collect a significant amount of product build-up, oil, dirt, and bacteria over time. When you apply makeup with dirty brushes, all of these impurities get transferred onto your skin, leading to clogged pores, breakouts, and even skin infections. Cleaning your makeup brushes not only helps to remove these impurities but also extends their lifespan and ensures that they perform at their best.
Properly cleaned brushes also ensure better makeup application. When makeup brushes are caked with old product, it becomes difficult to achieve a smooth and even application. Clean brushes allow for better product pickup and distribution, resulting in a more flawless finish.
Regularly cleaning your makeup brushes is a crucial step in maintaining a healthy beauty routine and ensuring that your makeup looks its best. Let’s dive into the common problems caused by dirty brushes and how often you should clean them.
The benefits of regularly cleaning your makeup brushes
Regularly cleaning your makeup brushes offers a multitude of benefits, both for your skin and your brushes themselves. Let’s take a closer look at some of the key advantages:
- Prevents breakouts and skin irritations: When you use dirty brushes, you’re essentially applying old makeup, dirt, oil, and bacteria onto your skin. This can clog your pores and lead to breakouts, irritations, and even infections. By regularly cleaning your brushes, you’re removing these impurities and reducing the risk of skin issues.
- Enhances makeup application: Clean brushes pick up and distribute makeup products more effectively than dirty ones. When your brushes are free from old product build-up, they can deliver better colour payoff and ensure a smoother and more even application. This allows you to achieve a flawless finish and make the most out of your makeup products.
- Preserves brush quality: Makeup brushes are an investment, and proper cleaning and maintenance are essential to protect that investment. When you clean your brushes regularly, you’re extending their lifespan by preventing the build-up of makeup, dirt, and oil that can lead to bristle damage. This ensures that your brushes remain soft, shape, and perform optimally for years to come.
- Maintains hygiene: As mentioned earlier, dirty brushes can harbour bacteria, which can lead to various skin issues. By keeping your brushes clean, you’re reducing the risk of bacterial growth and promoting good hygiene. This is especially important if you have sensitive or acne-prone skin, as clean brushes can help prevent further breakouts and irritations.
Overall, regularly cleaning your makeup brushes is essential for maintaining healthy skin, achieving flawless makeup application, preserving brush quality, and promoting good hygiene. Now that we understand the importance of cleaning our brushes, let’s take a look at some common mistakes to avoid when cleaning makeup brushes.
Common problems caused by dirty makeup brushes
Dirty makeup brushes can lead to a range of skin problems, affecting both the appearance and health of your skin. Here are some common problems caused by dirty brushes:
- Clogged pores: When makeup, oil, and dirt accumulate on your brushes, they can easily transfer onto your skin, clogging your pores. This can lead to blackheads, whiteheads, and acne breakouts.
- Uneven makeup application: Dirty brushes can cause your makeup to apply unevenly, resulting in streaky foundation, patchy eyeshadow, and uneven blush or bronzer application.
- Bacterial infections: Bacteria thrive in warm and moist environments, making dirty makeup brushes a breeding ground for harmful bacteria. Using contaminated brushes can lead to skin infections, such as staph infections and fungal breakouts.
- Product build-up: Over time, product build-up on your brushes can affect their performance. The bristles can become stiff, making it difficult to blend and apply makeup smoothly.
By regularly cleaning your makeup brushes, you can avoid these problems and keep your skin healthy and glowing. But how often should you clean your brushes? Let’s find out.
How often should you clean your makeup brushes?
The frequency of cleaning your makeup brushes depends on several factors, including how often you use them and the types of products you use. As a general guideline, here are some recommendations:
- Foundation brushes: Since foundation brushes come into direct contact with your skin and liquid products, they should be cleaned at least once a week. If you have acne-prone skin, consider cleaning them more frequently.
- Eyeshadow brushes: Eyeshadow brushes should be cleaned every one to two weeks, depending on how often you use them. If you use different colours frequently, consider cleaning them more often to avoid muddying the shades.
- Blush and powder brushes: These brushes can be cleaned every two to three weeks, as long as they are not visibly dirty. However, if you have sensitive or acne-prone skin, it’s best to clean them more frequently.
- Lip brushes: Lip brushes should be cleaned after each use, especially if you use different lip products or shades.
 If you have sensitive or acne-prone skin, it’s a good idea to clean your brushes more often to minimize the risk of breakouts and irritations. Additionally, if you’ve been sick or have used your brushes on someone else, it’s important to clean them immediately to prevent the spread of bacteria.
Ultimately, the key is to use your judgment and observe the condition of your brushes. If you notice that your brushes are visibly dirty, have a strong odour, or are not performing as well as they used to, it’s time for a thorough cleaning. By cleaning your brushes regularly, you’ll ensure that they’re always in pristine condition and ready to deliver flawless makeup application.
Remember, these are general recommendations, and you should adjust the cleaning frequency based on your own skincare needs and makeup habits. Now, let’s move on to the step-by-step guide for cleaning your makeup brushes.
Step-by-step guide to cleaning makeup brushes
Cleaning your makeup brushes doesn’t have to be a daunting task. By following this step-by-step guide, you’ll learn how to effectively and efficiently clean your brushes, ensuring that they’re free from dirt, oil, and product build-up.
Step 1: Gather your supplies
Before you begin cleaning your brushes, gather all the necessary supplies. Here’s what you’ll need:
- Gentle cleanser: Look for a cleanser specifically formulated for makeup brushes or opt for a gentle baby shampoo. Avoid harsh cleansers as they can damage the bristles.
- A bowl or sink: Find a clean bowl or sink that is large enough to hold your brushes comfortably.
- Warm water: Fill the bowl or sink with lukewarm water. Avoid using hot water as it can damage the bristles.
- Clean towel or paper towel: Have a clean towel or paper towel ready to blot excess water from your brushes.
- Brush cleaning mat or glove (optional): If you have one, a brush cleaning mat or glove can help to remove stubborn build-up and provide a deeper clean.
Step 2: Wet the bristles
Start by wetting the bristles of your brush under lukewarm water. Be sure to avoid wetting the entire brush, as this can compromise the glue that holds the bristles together. Instead, focus on wetting only the bristles.
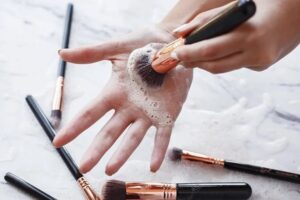
Step 3: Apply cleanser
Squeeze a small amount of cleanser onto your palm or directly onto the bristles. Gently swirl the brush in the cleanser, working it into a lather. If you’re using a brush cleaning mat or glove, you can also apply the cleanser onto the mat and swirl the brush on it.
Step 4: Clean the bristles
Using your fingers, gently massage the bristles in a circular motion to dislodge any dirt, oil, or makeup build-up. Pay extra attention to the base of the bristles, as this is where most of the dirt and bacteria accumulate. If you’re using a brush cleaning mat or glove, use the textured surface to deep clean the bristles.
Step 5: Rinse thoroughly
Once you’ve cleaned the bristles, rinse the brush under lukewarm water, using your fingers to gently squeeze out any remaining cleanser and dirt. Continue rinsing until the water runs clear and there are no traces of cleanser or makeup residue.
Step 6: Blot excess water
After rinsing, gently squeeze the bristles with your fingers to remove excess water. Then, lay the brush flat on a clean towel or paper towel and blot the bristles to absorb any remaining water. Reshape the bristles if necessary.
Step 7: Let the brushes dry
 Finally, allow your brushes to air dry completely before using them again. It’s important to lay them flat or hang them upside down to ensure that the bristles dry thoroughly and water doesn’t seep into the ferrule. Avoid using a hairdryer or any other heat source to speed up the drying process, as this can damage the bristles.
By following these step-by-step instructions, you can effectively clean your makeup brushes and ensure that they’re free from dirt, oil, and product build-up. Now that you know how to clean your brushes, let’s explore some recommended cleaning solutions and tools.
Common mistakes to avoid when cleaning makeup brushes
Cleaning your makeup brushes may seem straightforward, but there are some common mistakes that many people make. By being aware of these mistakes and avoiding them, you can ensure that your brushes are thoroughly cleaned and well-maintained. Let’s take a closer look at some of these mistakes:
- Using harsh or abrasive cleansers: When it comes to cleaning your brushes, gentle is the way to go. Harsh cleansers, such as dish soap or laundry detergent, can strip the bristles of their natural oils and cause them to become dry and brittle. Instead, opt for mild cleansers specifically formulated for makeup brushes or gentle baby shampoos, which effectively remove dirt and oil without damaging the bristles.
- Submerging the entire brush in water: While it may be tempting to fully immerse your brushes in water, this can lead to water seeping into the handle and compromising the glue that holds the bristles together. Instead, focus on cleaning the bristles only and avoid getting the entire brush wet. This will help maintain the integrity of the brush and prevent shedding or bristle damage.
- Skipping the rinsing step: After cleaning your brushes, it’s crucial to rinse them thoroughly to remove any leftover cleanser or makeup residue. Failing to rinse your brushes properly can leave behind a soapy residue that can irritate your skin and affect the performance of your brushes. Take your time to rinse each brush thoroughly under lukewarm water until the water runs clear.
- Drying brushes upright: When drying your brushes, avoid standing them upright or placing them with the bristles facing up. This can cause water to seep into the ferrule (the metal part holding the bristles) and weaken the glue that holds the bristles in place. Instead, lay your brushes flat or hang them upside down to allow for proper airflow and ensure that the bristles dry completely.
By avoiding these common mistakes, you can ensure that your brushes are thoroughly cleaned, well-maintained, and ready for your next makeup application. Now that we know what not to do, let’s dive into the step-by-step guide on how to clean your makeup brushes.
Recommended products for cleaning makeup brushes
When it comes to cleaning your makeup brushes, there are various cleaning solutions and tools available that can help make the process more effective and efficient. Let’s take a look at some of the recommended options:
- Brush cleansers: There are many brush cleansers on the market specifically formulated for cleaning makeup brushes. These cleansers are designed to effectively remove dirt, oil, and product build-up while being gentle on the bristles. Look for cleansers that are free from harsh chemicals and have good reviews from other users. They are often quick-drying, making them convenient for regular use.
- Mild shampoos: Another popular option for cleaning makeup brushes is using gentle baby shampoos. Baby shampoos are typically mild and free from harsh ingredients that can damage the bristles. They effectively remove dirt and oil while keeping the bristles soft and conditioned.
- Solid brush cleansers: Solid brush cleansers are compact and travel-friendly. They usually come in a soap-like form and can be swirled directly onto wet brushes for easy cleaning.
- DIY brush cleansers: If you prefer a more natural approach, you can create your own DIY brush cleanser using ingredients like baby shampoo, olive oil, and antibacterial essential oils. We’ll explore some DIY recipes later in this article.
- Brush cleaning mats or gloves: Brush cleaning mats or gloves are textured surfaces that help to deep clean the bristles and remove stubborn build-up. These tools have ridges and grooves that provide a gentle yet effective scrubbing action. Simply apply cleanser onto the mat or glove, swirl the brush on it, and watch as the bristles get thoroughly cleaned.
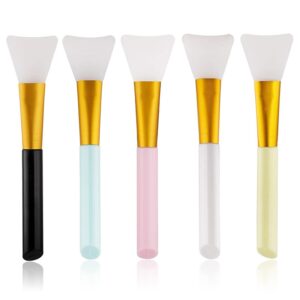
- Silicone brush cleaning pads: Silicone brush cleaning pads are another tool that can help to remove dirt and build-up from your brushes. These pads have various textures and grooves that provide a deep clean. You can find them in different sizes and shapes, making them suitable for all types of brushes.
When choosing a cleaning product, consider your skin type, brush material, and personal preferences. It’s important to ensure that the product is suitable for your brushes and does not cause any allergic reactions.
Drying and storing makeup brushes properly
After cleaning your makeup brushes, it’s important to dry and store them properly to maintain their shape and prevent bacteria growth. Here are some tips for drying and storing your brushes:
- Air dry: Lay your cleaned brushes flat on a clean towel to air dry. Avoid drying them upright, as water can seep into the ferrule and cause damage.
- Reshape the bristles: While the brushes are still damp, gently reshape the bristles to their original shape. This helps to prevent them from becoming misshapen as they dry.
- Avoid heat: Never use a hairdryer or any direct heat source to dry your brushes. High heat can damage the bristles and weaken the glue that holds them in place.
- Store them upright: Once your brushes are completely dry, store them upright in a brush holder or container. This prevents the bristles from getting bent or deformed.
By following these drying and storing tips, you can ensure that your brushes stay in top shape and remain hygienic for future use.
Tips for maintaining clean makeup brushes
Cleaning your makeup brushes is just the first step in maintaining their cleanliness and performance. Here are some additional tips to keep your brushes in pristine condition:
- Avoid sharing brushes: Sharing makeup brushes can lead to the transfer of bacteria and other impurities. It’s best to keep your brushes for personal use only.
- Remove excess product: After each use, gently remove excess product from your brushes using a clean tissue or paper towel. This helps to prevent product build-up and makes cleaning easier.
- Spot clean: For quick touch-ups between deep cleans, you can use a brush cleaner spray or a makeup wipe to spot clean your brushes. Simply spray the cleaner onto a tissue or wipe and swirl the brush bristles until the product is removed.
- Replace when necessary: Over time, makeup brushes can become worn out and lose their effectiveness. If your brushes start shedding excessively, have misshapen bristles, or become too stiff, it may be time to replace them.
By incorporating these tips into your beauty routine, you can maintain clean and effective makeup brushes, ensuring a flawless application every time.
DIY makeup brush cleaner recipes
If you prefer a more natural approach or want to save some money, you can create your own DIY makeup brush cleaners using common household ingredients. Here are a few simple recipes to try:
- Olive oil and baby shampoo: Mix equal parts of olive oil and baby shampoo in a small bowl. Swirl your brushes in the mixture to remove makeup residue, rinse thoroughly, and air dry.
- Antibacterial essential oil spray: Fill a small spray bottle with distilled water and add a few drops of antibacterial essential oil, such as tea tree oil or lavender oil. Shake well and spray onto a tissue or brush to spot clean.
- Baking soda and water paste: Mix baking soda and water to form a paste. Apply the paste to your brushes and gently massage to remove product build-up. Rinse thoroughly and air dry.
Remember to patch-test any DIY cleaner on a small area of your brushes before using it on the entire brush set. This helps to ensure that the ingredients do not cause any damage or allergic reactions.
Professional makeup brush cleaning services
If you prefer to leave the cleaning to the professionals or simply don’t have the time to clean your brushes yourself, you can opt for professional makeup brush cleaning services. These services specialize in deep cleaning and sanitizing makeup brushes, ensuring that they are thoroughly cleaned and free from bacteria.
Professional cleaning services often use specialized equipment and products to ensure a deep and effective clean. They can also help to restore the shape and softness of your brushes, extending their lifespan.
While professional cleaning services can be more expensive than DIY cleaning, they provide a convenient and time-saving option for those who want to ensure optimal cleanliness and performance of their brushes.
Conclusion: The importance of clean makeup brushes for a healthy beauty routine
 Regularly cleaning your makeup brushes is an essential step in maintaining a healthy beauty routine. Dirty brushes can lead to a range of skin problems, including clogged pores, breakouts, and bacterial infections. Cleaning your brushes not only removes impurities but also ensures better makeup application and extends the lifespan of your brushes.
By following the step-by-step guide, using recommended cleaning products, and implementing the tips for maintaining clean brushes, you can enjoy the benefits of flawless makeup and healthy skin.
Whether you choose to DIY or opt for professional cleaning services, make it a habit to clean your makeup brushes regularly. Your skin will thank you, and your makeup will look even more stunning when applied with clean and well-maintained brushes. So, let’s brush up on our beauty routine and say goodbye to dirty brushes for good.